
“9 tricks?” somebody asked while reviewing the hands at the bar after the game. “How did you manage that?”. My honest reply was that I ruffed one of my own winners. She still doesn’t believe me that this was the right play so here is the full hand and the reasoning behind it.
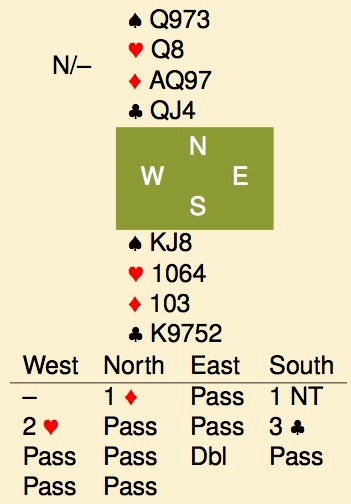
The contract is 3♣x, after a spirited auction where everybody took his best guess. Things start off well for declarer when west leads the ♥AK of hearts, east following with the ♥2 and ♥7, playing right side up count. You decide to believe this and ruff with the ♣4 when west leads a third round. East indeed follows suit. Next the ♣Q (♣3, ♣2, ♣8), followed by the ♣J, ♣A, ♣5 and a ♥3 discard. A small spade is returned, and your ♠K wins the trick.
This was a matchpoints came and in competitive auctions it is good to guess what EW can take in their contract. East has shown 2 aces, that is 2 tricks. With 8 trumps, declarer is probably going to take a losing heart-finesse, so that is only 4 tricks there, for a total of 6. The ♦K might come in if east has that card but that still makes it only 7 tricks for the opponents. So, better make the contract as I otherwise would have turned a plus into a minus score.
Can this be done? I have lost 3 tricks and still have to give up the ♠A. Moreover, east has ♣106 left, you have the ♣K97 but no trumps left in dummy. The only way to pick up the trumps, is to force east to ruff something that you can overruff.
First order of business is to knock out the ♠A. East wins and returns a third spade, won in dummy as the suit splits 3-3.
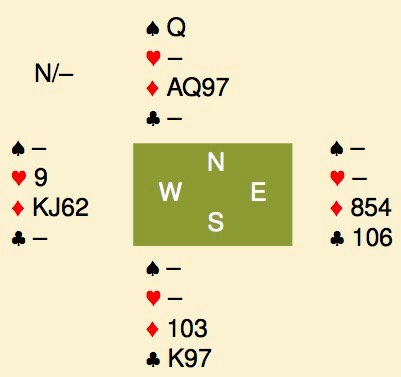
The distribution is now clear: east has shown 4 clubs, 3 spades, 3 hearts and thus 3 diamonds. 5 cards are left and they are divided like this. The only unknown is the ♦K, for now we assume that it in front of the ♦AQ, if not, the contract will go down regardless.
Is there a way to make the remaining tricks? Yes, ruff the spade even though it is a winner. Return to dummy with a diamond finesse, cash the ♦A and lead a diamond. East will have to follow suit on the 2 diamonds. His last 2 cards are the ♣106 with your ♣K9 behind them. Note that this doesn’t work if you discard a diamond on the spade, then play the ♦A. You are forced to ruff the next round, then lead away from ♣K9,
West indeed had the ♦K, so 9 tricks, and a top. Isn’t this risky? After all, you would have gone down if the ♦K was offside. While this is true, you would not have made the contract either if you had discarded the ♦3 on the 4th round of spades. Also, if east had the ♦K, his hand would have been something like ♠Axx, ♥xxx, ♦Kxx, ♣A10xx and he would surely have bid 3♥ over 3♣.
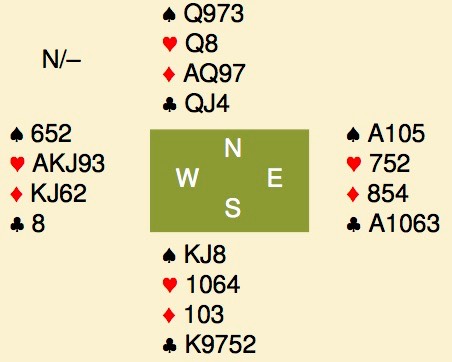
Here is the full hand. Note that ducking the ♣J in trick 5 does not help the defence. Declarer continues spades and the end position in trick 12 is quite similar, east has ♣A10, south ♣K9 with the lead in dummy. Declarer has to score 1 more trick and will always do so.