The title of today’s blog crossed my mind when talking to a few folks in the bridge world last week. Something important will happen there in the next week, I can’t give you details but stay tuned to your favorite news-site. In the meantime, time for some bridge, with a title for a blog but no publishable content, I was fortunate to run across 2 hands where the defense knows something that declarer doesn’t. Can they use it to their advantage by trying to hide this little secret? Here are 2 examples, both hands are from a imp-pair event at the club on Friday evening, try them as a problem.
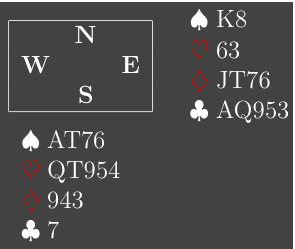
First you, south, are defending 3NT on this layout.

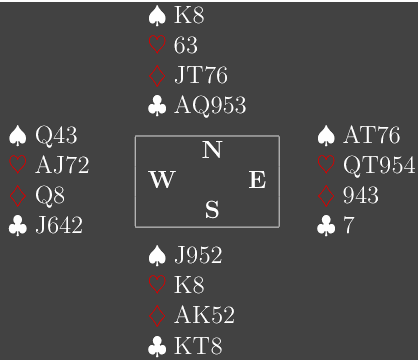
East started the auction with pass, so did you, 1♦ on your left, pass, 2♣, pass, 2NT, pass, 3NT, all pass. Partner lead the ♥2 (attitude) and it is time to take stock. Looking at dummy, this looks like a fairly aggressive contract, with only a 10 count in the dummy and declarer holding at most 14. Declarer plays small from dummy, you contribute the ♥Q and declarer wins with the ♥K. Is that good news?
Yes, it is. Partner has likely led from a 4-card suit, which gives declarer ♥Kx. To defeat the contract, all you have to do is to gain the lead and play a heart. Declarer continues with the ♣10 to the ♣Q and a diamond back to the ♦K. This confirms what you already thought. Declarer continues with the ♣K from hand.
Plan your next 4 discards as declarer is likely going to run clubs.
It is obvious that you can spare 3 spades but what about the last one. A diamond seems obvious but is it? From the earlier play, declarer figures to have ♦AKxx (with AKQx, the hand is boring anyway). Now you know that the ♦ Q is offside but also that declarer can drop her. So, make sure that declarer will take the finesse.

Now, look at the full hand from declarer’s view. Heart lead, club to the ♣Q, diamond back, 4 more clubs. RHO discards 3 spades and a diamond. A diamond? He surely would not do that holding ♦Qxx(x). So, when a diamond is led from dummy, declarer has no option but to rise with the ♦A.
What happened if you discarded a heart sometime. Well, declarer would have seen 4 clubs and 4 or 5 hearts on his left, versus only 1 club and 4 hearts on his right. That strongly suggests that the long diamonds are on his right and it is good to take a finesse. That is not a success on this hand.
By the way, take a look at the clubs on this hand. Beginners are often taught to lead the honor from the short site when the suit is first played, but that is horribly wrong with this position.
The second hand.

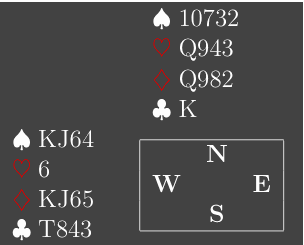
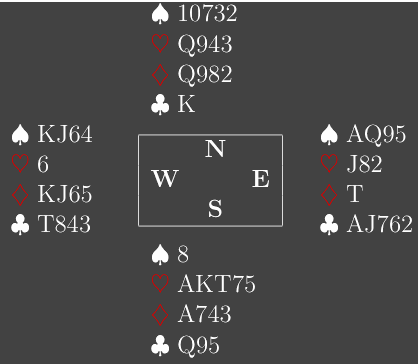
As west you hold this hand. The opponents bid 1♥, 3♣ (6-9, with 4♥), 3♦, 4♥. 3♦ asked if responder was minimum or maximum. With little clues from the bidding, you decide to lead a diamond, ♦8 from dummy, 10 from partner and declarer wins with his ace. 3 rounds of trumps follow, partner following 3 times, a club is led to the K and partner’s A. Partner returns the ♠A and leads a second round, ruffed by declarer.
A diamond is fired back and you?
Duck!
You know that it doesn’t really matter what you do now, but does declarer know? No, he doesn’t. It is standard to play the 10 from both ♦10(x...) and ♦J10(...) in trick 1. You know what partner has, declarer doesn’t.

Now look at the full hand, declarer really has to play small to the ♦9 here. A diamond to the Q is not sufficient. Could you have prepared for this? Yes, make it a habit to visualize declarer’s hand. That is simple here: singleton spade, 5 hearts, ♦Ax(...) and ♣Qx(...). With good clubs, he is never going to play on diamonds, so his full hand must be something like ♠x, ♥AKxxx, ♦Axxx, ♣Qxx. Once you know this, you know that a small diamond creates a problem for declarer. In practice, the defender went up with the ♦K and we’ll never know if declarer would have gotten this right.
