
While the stars are battling it out in Bali, there is still also bridge in the Arnhem region. Had the next hand from Tuesday's duplicate been dealt there, it would have definitely made the daily bulletin.
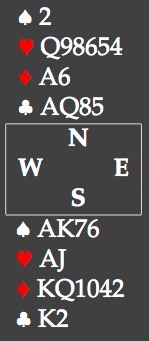 Butler scoring, and you are as south in 6♥, after an uncontested auction on a ♠J lead. Plan the play, then read on.
The problem is in the trump suit, which you have to keep to 1 loser. With trumps 3-2, there is no problem, cross to dummy, take a finesse, regardless of whether it wins or loses, you are now pretty much safe. You even have an overtrick if your right hand opponent has ♥Kx. The alternative is to give up the overtrick right way, by cashing the ♥A and playing a heart. But what about a 4-1 split?
G and everybody else, think before reading on!
If the singleton ♥K is with west, taking a finesse is wrong. West wins, and east will score a trick from his ♥10xxx. Cashing the ♥A works better, the ♥K drops and your only trump loser will be a trick to the ♥10xxx. Obviously, this also works when east has the singleton ♥K. A singleton ♥10 isn't a problem either. And what if somebody has ♥K10xx?
If east has ♥K10xx, you will go down whatever you do. East simply follows small twice when you lead up to the ♥AJ, then scores 2 tricks with the remaining ♥K10. If west has the ♥K10xx, you can still make the contract with though. All you need for that, is to end up in a position where dummy has (exactly) ♥Q9 left and west ♥K10 and you can afford to lose a trick (or ♥10x and west has taken his ♥K earlier). To reach that position, you will have to ruff 2 spades in order to shorten dummy's trumps.
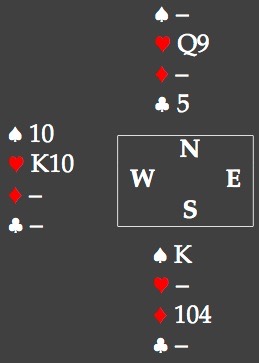 Usually, ruffing in the hand with the long trumps is not a good idea, as this will often lead to a loss of control and hardly ever produces tricks you won’t get anyway, but here the correct line of play is to ruff a spade in trick 2. Then a heart back to the ♥A and in trick 4 the ♥J. West plays small and your careful planning has worked out when east shows out. Now ruff a second spade reducing yourself to ♥Q9 with west having ♥K10, cash the ♣KAQ in that order, then the ♥A and a diamond back to the hand. If that survives, start cashing spade and diamond winners. With 1 to go, the position will be something like with the lead in south and north having the 13th club. South leads another winner and west has to surrender. 12 tricks.
Note that it doesn't do west any good to win the ♥K in trick 4. One reaches essentially the same end position with west having ♥10x in front of north's ♥Q9. Also note that ruffing 2 spades is essential. If you don’t, north will have ♥Q98 left in the end position and is forced to ruff one of south winners, then conceed two tricks to west ♥K10. Try it with a deck of cards if you con’t believe me.
This line of play works whenever west has ♥K10xx and at least 2 spades, 2 diamonds and 3 clubs. Half the club missed it, probably explain why we are in Arnhem and they are 10,000 mile away playing in Bali.