
The year started off quite badly with the announcement from the Dutch NCBO NBB that the 2019 Bermuda Bowl will not be held in The Netherlands. For the original version, go here, if you don’t read Dutch, this is what it says:
The WBF, B.C.’t Onstein/Mr. Melchers (sponsor) and the NBB have been investigating since last summer if the NBB could organize the 2019 Bermuda Bowl in the Netherlands. Parties did sign a letter of intent in June 2016, which ran until November 30th. Unfortunately, the conclusion had to be drawn that the negotiations between the parties have not led to a positive result. The NBB has notified the WBF that the NBB cannot organize the 2019 Bermuda Bowl.

Why the negotiations haven’t led to a positive result, has not been officially announced and all parties keep their mouths shut. There is, however, a fairly believable rumor floating around, but as that is unconfirmed, I’m not going to publish it.
This means the 2019 Bermuda Bowl won’t be in Amsterdam, which would have been a great location for a great event. And with the spot now open: if you always wanted a Bermuda Bowl in your neck of the woods, all you have to do is call the WBF and write a 7 digit number on a check…
No doubt to be continued in one way or another.
Several readers pointed out a flaw in the previous article: south can lead a small club to his partner’s 10. North then returns a spade for down 1. So, no, it is not an endplay in trick 1.
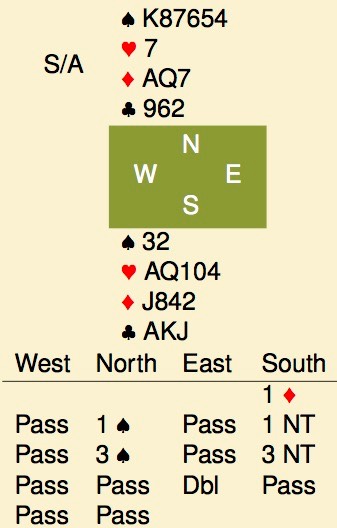
Endplays in trick 1 do exist though. Take a look at this hand from an old (1969) tournament, originally reported by Alan Truscott. 1NT openers were 16-18 back then, which explains the 1♦ opening bid. The double asked, conventionally but pretty standard by now, for a lead in dummy’s suit. West, however, led the ♣3, 4th best, ♣2, ♣8, ♣J. Take it from there.
Obviously west has a spade void, the club lead suggests a 4 card suit, so his shape will be 0-?-?-4. You don’t have many tricks yet, so the diamond finesse should be on, better take that in trick 2 and see what happens. ♦2, ♦3, ♦Q, ♦6 and cash the ♦A. East follows with the ♦9, strongly suggesting a 3-3 split in diamonds. That makes west’s shape 0-6-3-4. Can we make use of that?
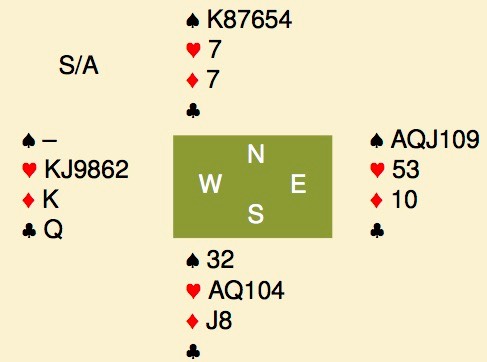
Yes, the position is now something like the diagram on the right. We can now cash 2 top clubs and exit with a diamond. West can cash the 4th club but then has to lead a heart, giving up another trick. With the ♥A and ♦J still to come, that brings our total to 8 tricks. How about the 9th?
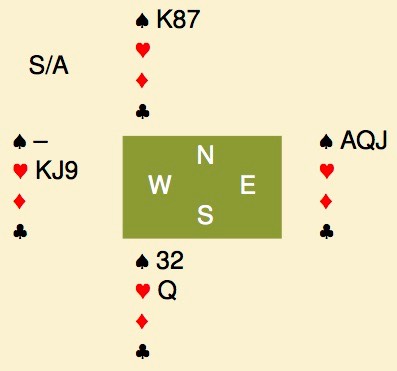
At this point, we have to look at the east hand. East started with 5♠-2♥-3♦-3♣ shape. He has had to follow to 3 rounds of clubs, 3 rounds of diamonds and 2 rounds of hearts, which means that all he has left is ♠AQJ109. We can now secure our 9th trick by ducking a spade to east. East can cash ♠AQ but then has to give the last trick to the dummy.
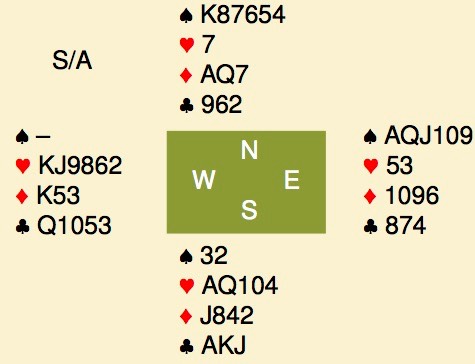
The full hand was this. Note that west is endplayed at trick one, a heart or a club lead costs a trick straight away, while a diamond lead allows declarer to set up a 4th diamond. After all these leads, declarer can essentially follow the same plan as above, leading to 9 tricks. In all cases, the opponents are forced to give up a trick 3 times.